Adventures in Loxone: 1 - Basics of Wiring
When starting off with Loxone, one of the first things to deal with is wiring it all up. What types of wire? Connectors? Why? and more. I start off with the basics of wiring - not quite all the scary details to make a code-compliant cabinet, but enough to get you started in the journey of planning.
10/30/202421 min read
Overview
One of the things Loxone talks about the least is wiring. I believe it's both because electrical code varies so much between cities, states, and countries, and also to avoid legal liability should anything problematic happen. Thus, that's one of the areas that I had to do the most reading and learning, and where I therefore start our journey. Having said that - you should always consult with a licensed professional (e.g. electrician) and/or your local Authority Having Jurisdiction (AHJ - your inspector) if you need detailed guidance.
Topics Covered:
Basics of Voltage, Current and Power (Watts)
Wire Gauge and Ampacity
"Chapter 3" Wiring
Class 2 - Your Best Friend
Designing Trees for Class 2
LED Strips and PWM WW Lighting
Sourcing Enclosures and Wires
Basics of Voltage, Current, and Power (Watts)
Most household wiring in the USA is 120V Alternating (AC), and most circuits are capable of providing 15-20Amps of current. Voltage is sometimes referred to as 'potential', and it can be thought of as "How much does the electricity WANT to get from A to B?" Very high voltages mean the electricity is really motivated, and can jump across the air as a spark. Current (Amperes) is a measure of how many electrons are actually going from A to B. A high voltage with a low current means the electrons want to go... but aren't. A low voltage with a high current means that the electrons don't particularly care, but are going anyway.
Thus - high voltage AND high current means you've got motivated electrons, moving en masse. These motivated electrons are willing to do a lot to get from A to B, and if you multiply the voltage times the current, the magic of metric units (Volts * Amps) means you get Watts - a measure of power. US household circuits therefore can provide ~1800W to 2400W of power, which is quite a lot. It's double what your microwave needs, enough to make the wires in a space heater or toaster bright red hot, and more.
At the same time, they don't have to do that. If you think of the 'hot' and 'neutral' wires in a US household circuit, the electricity wants to go from the hot to the neutral, but if you don't give them a good way to get there... they won't. Thus, for a simple wall receptacle, with nothing plugged in, despite there being 120 Volts between the terminals, there's not really any measurable current - it's not like there's a spark jumping from one terminal to the other. If you provide a path between the two (such as putting a toaster into the receptacle), the electrons will start rushing through the toaster - as many as can fit through the new path. The toaster isn't an easy path - so only so many Amps will flow. If you connected a pure wire, that's an easy path - so as many Amps will flow as possible. This ultra-easy path is commonly referred to as a 'short', and is what your circuit breakers are designed to protect against. If your circuit breaker notices more than 15A (or 20A, depending) flowing from 'hot' to 'neutral' on a given circuit, the breaker will say "Whoa there! Too much! Something must be wrong!" and disconnect the circuit.
Loxone, in general, operates on only 24 Volts, which means the electricity is a lot less motivated. Similarly, the allowable current is often much lower - generally 10A, or even 3.67A, so the total power available/used in a Loxone system is only 88W to 240W. This is not enough to run a toaster, microwave, or other high-power thing. But it is enough to run some lights, some sensors, and other similar things, and it's much safer and simpler due to the lower worst-case scenario. We'll talk more about this in the section "Class 2".
Wire Gauge and Ampacity
As electricity rushes through a wire, it bumps into the atoms, transferring energy into the wire as heat. Too much heat means a fire, so a lot of electrical fire safety means making sure at least one (or both) of these things is true:
(1) The amount of electricity moving through the wire is small (Current is at most X Amps). You can visualize this as a highway with only a few cars on it.
(2) The wire is so big that there's plenty of space for the electricity, and it doesn't heat up much. You can visualize this as a highway with many lanes.
If there's too many cars, and not enough lanes... bad things happen. So we spend a lot of effort to make sure that we always know how much current flows through any wire, and that the wire is sufficiently large to prevent issues with that amount of current.
Importantly, note that Voltage does not matter for this. The heat generated (and power dissipated) in a wire is related only to the current flowing through it, and the details of the wire.
The National Electric Code (NEC) is very clear on how many Amps they allow through wires of various sizes. For (really annoying) historical reasons, the USA uses "American Wire Gauge" (AWG) as a measurement of wire size. Lower numbers mean thicker wires. I believe (and I may be incorrect) that in the 'old days', wire was made by pulling it through a tiny hole to shrink it, and you could only shrink it so much without it snapping. Thus, if you wanted thick wire, you only pulled it through a few holes, while if you needed tiny wire, you'd have to pull it through a lot of times. Thus, a 18AWG wire is much much thinner than a 12AWG wire. In fact, every 3AWG means double the size, so a 12AWG wire is 4 times bigger than an 18AWG wire - and can carry 4 times the current without fear of fire.
The table lists some important wire gauges, and the maximum current they should be asked to carry. Note that only two of those wires (12 AWG and 14 AWG) are actually specified by the NEC that I can find. The rest I had to use basic math to calculate, and while I trust that I'm correct, you can/should always verify and confirm things on your own.
The Loxone Tree Cable has two wire gauges inside of it - a thick (16AWG) pair for carrying 24V 'bulk' power, and two thinner (23AWG) pairs for carrying the tree data signal, and optionally 24V 'tiny' power. This means that the 16AWG pair is capable of at most 10 Amps. Any more than that, and you are explicitly at risk of a fire. Don't do that. Ever. Since that pair is expected to carry 24 Volts, it also means that a given Tree Cable can provide, at most, 240 Watts. (Note that in a later section, about "Class 2", I'll explain why it should rarely or even never be asked to actually do that). The thinner (23AWG) pairs are capable of handling just over 1.5 Amps, and honestly, you should never get close. The whole point of those wires is to carry almost negligible power, and if you're ever even near 1A on those ... something is very strange with what you're doing.
Chapter 3 Wiring
The NEC is very much intended and designed for 'traditional' household wiring. The kind of wiring that wants to burn your house down, if you let it. There's an entire chapter of the NEC (Chapter 3) that describes how one must/shall wire various things. It has a number of very strict (and somewhat annoying) requirements as a result, and unless otherwise explicitly allowed - we must follow all of them. I won't copy-paste the entirety of Chapter 3 here, but I will give you some key highlights:
The thinnest wire allowed is 14AWG no matter how little current you are carrying
All wire must either be in a conduit/raceway, or 'self sheathed'. This protects wires from accidentally having nails driven into it, or getting accidentally cut. The 'self sheathed' is referred to as "NM-B", or "Romex" - which is what 90%+ of household wiring is done in. It's a solid copper cable, and always has a ground conductor included in the cable bundle. So "2 conductor Romex" is actually three conductor - commonly 'hot', 'neutral' and of course, 'ground'. Even NM-B/Romex has to be protected inside a wall, not run outside of it.
All junctions or connections must be accessible by the homeowner without damaging/destroying any part of the home/wall. This means you can't have any connection or junction unless there's a hole/panel in the drywall to get to it without cutting the drywall.
All junctions and connections must be in an enclosure (a junction box).
All cable must be run at least so many inches from the surface of the drywall (again, to minimize chance of hitting it with a nail/etc), and restrained in place to keep it from moving closer to the drywall.
Grounded conductors must be white or grey (this means that when using Loxone Tree cable, the 24VDC should be the orange, while the neutral/ground should be the white)
In short, this is the wiring that your electrician has to do, for the entire house, and to be honest, it's cumbersome. Worse-yet, you can't use Loxone Tree cable. Loxone Tree cable isn't 14 AWG, nor is it 'self sheathed', so you'd have to put it in conduit. To be blunt, avoiding Chapter 3's requirements pretty much shapes and guides everything else I talk about in this document. How do we do that? We rely on Class 2.
Class 2 Wiring - Our Best Friend
NEC Article 725 discusses various other ways to wire things. All of them are special cases - if you do not meet a special case, you 'fall back' to Chapter 3 wiring, which, as noted, is annoying and painful. So you really want to make sure you fall into one of the special cases. The one we will rely on is "Class 2". To be considered Class 2, there are several requirements that must be met:
Your circuit must be powered only by an explicitly listed Class 2 Power Supply (You can't use a higher power supply and fuse-limit it!)
Class 2 circuits must be separated from any other higher-power/other rated circuits. They cannot share a raceway or enclosure with power, lighting, etc. (There is an exception if they are separated by a barrier). Generally, you need at least 2" or more between Class 2 and other circuits.
Class 2 circuits, if 24V (as our Loxone systems are) must have no more than 100W at their power supply, meaning no more than ~4A under any circumstances. If 12V (as in, for example, some automated roller shades) it must be less than 60W.
If you do meet Class 2, however - life is so much easier. At that point, you can use cable that is "CL2" rated, such as the Loxone Tree Cable, and you need not put all junctions in enclosures/boxes. (Note that all junctions must still be accessible, however!).
Previously, Loxone only sold one very important power supply that addresses this limitation: The 3.67A@24V from TDK-Lambda. Note that it literally says "Class 2" on it, as it must. Interestingly, the picture on Loxone's own shop doesn't include that language, which means the picture is wrong. More recently, Loxone introduced their own DIN rail supply , which, while I haven't used, is listed as Class 2, and likely would work well.
I also love and recommend Meanwell power supplies, such as the HLG-100H-24A, will discuss cases in which to consider using them later on in the series.
Designing Trees for Class 2
For a given tree to be Class 2, it must be powered, exclusively, by a rated and labeled Class 2 supply. Since each tree extension supports two trees, when I design systems, I use a separate DRL-100-24-1/C2 from TDK-Lambda for each tree. That supply is rated for up to 88 Watts, which means that each tree can support 88 Watts. In general, things like switches, sensors, and other Loxone components don't draw meaningful power. In general, the only Loxone components that draw measurable power are the lights and lighting components. Importantly, the recessed can lights (e.g. LED Spot RGBW Tree) consume up to 7.5W at most, and the big circle ceiling light (LED Ceiling Light RGBW) consumes 20W. Thus, at most a given tree (if class 2) can support either 11 LED Spots (82.5W), or 4 Ceiling lights (80W) - or some combination thereof. That leaves just a few Watts for other things, like Touch Pure Switches (0.095W), Damper Trees (2.3W), and Presence Sensors (0.25W) - but as you can see, most other components don't take nearly as much power, so aren't nearly as important.
If done in this fashion, with one Tree Extension ($153) and two TDK Class 2 supplies ($80 each), it costs ~$313 for two trees, and each tree is capable of 88W, so you're paying roughly $1.78 per Watt.
It is possible to put multiple Class 2 supplies into a single tree (with appropriate fancy wiring), which means you don't need as many Tree Extensions. But to be honest, I don't see the increased complexity as worth it. If I used a single Tree Extension, and SIX Class 2 supplies, that's $633 for 528W, or $1.20 per Watt. Honestly not worth it to me, given the complexity. Note that you must not and cannot just put multiple Class 2 supplies 'in parallel' - that violates the whole spirit of Class 2.

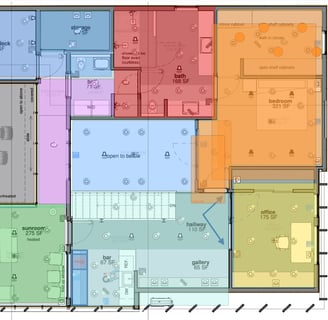
A Case Study/Example
I use the above figure (an actual client floorplan, with permission) to demonstrate how I recommend designing trees. In this example, I grouped various rooms/regions, such that each region has 80W or less of lighting components. I don't worry about the 'tiny things' like the switches and such, as I've got 8W 'extra' per supply to handle those, and that leaves 80W for lighting.
Starting from the top-left, in the 'Bonus Deck', I see 4 Tree Spots (4*7.5W=30W), which leaves plenty. So I continue that tree into the Storage area next to it. That has a single Ceiling Light (20W). That tree is now up to 50W, and has 30W left to go. I can't extend it into the Primary Bath, as that has 7 Tree Spots (needing 52.5W), nor can I extend it into the smaller bath, which has 2 spots (15W) and a ceiling light (20W) needing 35W. Thus, I 'end' that tree, and labeled it "6A", as it comes out of my sixth Tree Extension, and uses the "A" port on it. I continue into the primary bath, give it a whole tree, as it consumes 52.5W on its own.
Note that this is explicitly mildly wasteful. I could try and pack things more tightly, and try and get closer to 80W per tree - for example, I could have put just a few of the bathroom lights onto the tree. This would, however, complicate the wiring a little bit, as then I'd have to be much more careful when roughing in to know which lights go with which tree. Similarly, if later on in the design-iteration process with the client, we wanted to add just 1-2 more lights, we wouldn't have the headroom to do it, and would have to fully re-design the trees. So I like to keep it simple, and try to ensure that rooms aren't split across more than one tree.
The bedroom, then, adds some complexity. You might notice that the closet lights are marked on the diagram with 'orange dots'. I did this because those lights aren't powered by the Tree. Those are PWM WW lights in the closet (who needs colored lights in the closet?), and therefore, they are not necessarily driven by the Tree. Instead, I drive those with the RGBW Compact Dimmer Air (I love those things). That unit can be easily placed near the point-of-use, and can take its own direct 24VDC supply, and therefore, does not need to count as part of the Tree power usage. This is where I find the Meanwell Class 2 supplies to be very useful. I can buy one of those, and wire it directly into the dimmer, and get a nice, simple, isolated Class 2 system. My partner electrician can either put a 3-prong plug onto it, and we plug it into a receptacle, or we can directly wire it into a nearby household circuit (which requires an accessible junction box, as that part isn't Class 2!) - both of which are easy enough.
In one large customer home, I've had to use 18 different trees, requiring 9 tree extensions. This allowed up to ~1,584 Watts of total tree-load, but used only ~1,000 Watts of total lighting in the home, to keep the tree wiring simpler and more straightforward. It is likely that your installations will be similar - an 88W max per tree, using on average 63% of that power.
LED Strips and PWM Lighting
As I mentioned above in the Case Study, lighting driven by RGBW Dimmers does not need to consume 'Tree Power'. Instead, it consumes from whatever powers the dimmer. Loxone Dimmers (regardless of Tree vs Air, compact vs full-size) have four channels, each capable of up to 50W each, for a total possible 200W. Importantly, if you try and reach that 200W... you've just made the system no longer Class 2 compliant, as you'd need a supply above the 100W limit of Class 2.
This is not a terrible thing! Unlike the trees, which get rather complex, there is a way to handle this in a Chapter 3 compliant fashion, without massive headaches, and this is expressly thanks to the "Compact RGBW Dimmer" style made by Loxone. That particular unit is so useful, once you realize 'the tricks' built into it. I'll discuss a few approaches now.
Scenario 1: Class 2 is King
If we want to maintain Class 2 operation, then the whole dimmer is limited to 88-100W (depending on the supply you're using). That's not necessarily a lot when discussing lighting. As noted earlier, that's maybe 11-13 lights at most, which is 5775 to 6825 Lumens; enough for a room around 288-340 square feet at most, and far less if it's a room you want really bright (like a Kitchen or Bathroom). Worse-yet, some LED strips are ~6W per foot, or ~96W for the 16 foot reels they sell them in. (Hint: Many vendors conveniently sell them in Class2 lengths...) So it's very easy to use a whole Class 2 supply for a single RGBW strip. In such a scenario, you can either use a DIN-mounted power supply, or a Point-of-use mounted supply. Because it's class 2, the wiring is simple - you can use nearly any sane CL2-rated cable to carry the 24VDC (and Neutral) to the Dimmer. To minimize voltage drop, and to maximize simplicity, I actually like using 16 AWG, 2 Conductor NM-B "Romex". This carries the 24VDC (and neutral) from the DIN-mounted supply, all the way to the dimmer, and despite being overkill, is clearly separate/different than normal Romex used for AC wiring in a home. The 16AWG is only rated for Class 2 however, so must not be used for higher currents.
Scenario 2: Go Big or Go Home
At the same time, some loads are simply too big for Class 2. I see them routinely in Kitchens, Bathrooms, and with large RGBW LED strip installations. To make full use of a Loxone dimmer, you need to provide it at least 200W. Again, I like Meanwell supplies, so recommend one of these two options: DIN Mounted, and Point-of-Use. Both of those are 240W supplies, making them very much not Class 2. Thus, we must use Chapter 3 wiring - electrician style. Suppose we want to go DIN mounted. In that scenario, we have to be very careful about how we mount things in the cabinet. Because even the 24VDC output isn't Class 2, we need to keep it at least 2" away from the rest of our cabinet (that is Class 2), and better yet, keep it physically isolated from them. We also need to use 14AWG NM-B wire (inside a wall or raceway!) to carry the 24VDC, because again, we have to treat it like normal household wiring, and 14AWG is the smallest gauge you're allowed to do. You need to use appropriate clamping/mounting/strapping of the wire, as per NEC Article 334.30, which means every 4', and within 12" of every junction box/enclosure. Once you get to the dimmer, then, the magic of Loxone's design comes into play. The Compact dimmer format is vitally important (never use their 'normal' dimmers). The 24VDC will enter the 'bottom' of the dimmer, which has a cover, and a place to Zip-tie the cable into place. Thus, the dimmer itself counts as the enclosure, and strapping for the cable. SO USEFUL.
Once you leave the dimmer, then, things get even more interesting. If at all possible, you want to go directly to the LED strip. Again, the LED strip at this point is also not Class 2, so once again, we rely upon/love the Compact Dimmer for 'being' a valid enclosure, providing strapping, and such. If we do not go straight to the LED strip, and it's RGBW, we'd have to use conduit at this point, as there's no sane way to use Romex/NM-B/etc to get from the dimmer to the LED strip. Romex isn't made with enough conductors to handle RGBW. So make your life simple, put the dimmer AT the LED strip tail, and run Romex to the power supply.
That, of course, is even easier, if the power supply is right at the dimmer. This is where those Meanwell HLG-240H-24A units come in handy. You can feed the 24V output cable of the unit directly into the dimmer, at the point of use. Then you 'just' need to provide power to the supply, and that means either putting a plug onto it, and having the electrician provide a receptacle, or have the electrician wire it directly into a 120VAC circuit with an appropriate junction box, etc.
An Aside
I have no use for these units, ever. First, DIN-mounting an Air device is ... just insane. Second, you can't easily mount it at point-of-use, which means you'd have to run from it TO the LED strip, and that is generally annoying and painful - you have to run ~5 wires, do 5 junctions/splices, and more. Just not worth it. I strongly recommend using only the "Compact" format of the Loxone dimmers, ever. There's just no reason to stock anything else. I suppose there's a use-case if your enclosure is right at where the LEDs go, but ... that's such a rare case that it's not worth it.
Sourcing Enclosures and Wires
Loxone components like the Miniserver, extensions, and such, generally want to be mounted on DIN rail. Loxone US has been ... less than helpful in making sure we can buy appropriate enclosures, and we do not have access to the really nice vendors of such things that are found in the UK, for example.
Now, this isn't necessarily a bad thing. You don't need an enclosure... if everything is Class 2. Technically, you could just buy 'loose' DIN rail, mount it on plywood, and mount all of your components.
Powering them is a different story, however. The 120VAC->24VDC supplies do need to be treated carefully, as those (on the 120VAC side) are not inherently safe, and thus, must be enclosed. Your electrician can be responsible for this if you'd like. Thus, one very low-cost, but (as far as I know) code-compliant option, would be to buy a sheet of plywood, and on the bottom, mount several Meanwell HLG-100H-24 units, with the 24VDC side 'facing up' and the 120VAC side "facing down". Your electrician can then provide 120VAC to them in any code-compliant way they'd like, such as with plugs/receptacles, or by splicing them inside junction boxes. Once the power comes out of the Class 2 supplies, however, it's Class 2, and you can 'just' go up to the various Loxone components - Miniserver, Tree Extensions, and the like.
Now, that does leave your wires 'out and unprotected' and I don't think many clients would be happy with that, and some inspectors might... not like it. So you can then consider buying a standard NEMA 1 box. My first installs used these boxes: Hoffman/nVent 24x24x8 with perforated panel and knock-outs. These boxes are very nice, as they have knock-outs already prepared, and the perforated panels make it super easy to mount the DIN rail and cable troughs, etc. For small to moderate installations, this is all you'd need. An example parts list is here:
For very large installations, especially those with a lot of power supplies needed, I like bigger-yet boxes, as that helps me keep the 120VAC separate from the 24VDC (again, 120VAC is Chapter 3, and must be kept separate/isolated from your Class 2, so you can't easily put them on multiple rails). These larger boxes don't come with knock-outs, so I'm forced to use a knock-out tool and/or drill to make holes prior to assembly (don't want metal shavings falling into your components!). Here are some example options:
Saginaw 36x30 SCE-36N3008LP and Perforated Subpanel SCE-36N30MPP
Hoffman 36x30 A36N30BLP and Perforated Subpanel A36N30MPP
Note that these are only 6" wider than the other boxes above, but that is sometimes very helpful to fit just a little bit more. Again, these larger ones don't have knock-outs, so do also require a bit more work.
Another option, mind, is to simply have/ask the electrician on the project to provide an enclosure for all 120VAC->24VDC, and then run the 24VDC into your Loxone enclosure separately. This is especially helpful if everything DIN-mounted is Class 2, as it keeps things simple.
Finally, if you want something really nice, I just signed up as a dealer for Future Automation, who makes the gold standard for Loxone enclosures. They are a little bit more expensive than the brands I mentioned above, but they come assembled, with everything from DIN rail to wire troughs installed, and have a higher-end appearance. Reach out to me, and I can likely help you get the enclosure you need. (Update, a year later: I cannot say how much I love the FA enclosures, for their professional look, ease of working with them, and more. It's honestly not worth saving a few hundred bucks in most cases - sometimes jobs are just easier, and more professional, if you buy the 'right' components up front, and just do it as a high quality project throughout)
Voltage Drop (and Rise!)
All wire has resistance (unless you're dealing with superconductors - and you likely are not). This means that as current moves through the wire, it not only heats the wire, it also loses some of its 'motivation' (Voltage) along the way. This is likely best explained by an example.
We'll take two extremes. In both cases, I have a 24V supply running on the Loxone Tree Cable's 16AWG pair, powering 6 Loxone Tree Spots, which together consume 45W. In one case, the spots are 'near' the supply, and in the other, they are 'far'. I'll make near something simple - let's say, 30 feet out from the cabinet, and 30 feet back. In the far case, we'll go extreme - something like 600 feet out, and 600 feet back. (20 times further each way).
Since the lights consume 45W on a 24V supply, that means roughly 1.875 Amps would be flowing through them in the nominal case. Now, I'm going to have to do some really basic electrical engineering (so simple) but I haven't explained where it came from yet, and for that, I apologize. The resistance of 16 AWG copper wire is 4mOhms per foot, so in the 'near' case, those 30 feet add up to 0.120 Ohms each way, while the 600 feet case adds up to 2.4 Ohms each way.
If 1.875A flows through 0.120 Ohms, there's a voltage drop of 0.225V going to the lights, and another one coming from the lights, for a total of 0.45V "lost". If your supply was 24V, the lights will 'see' 23.55V, which is still totally in spec, and fine, and no one really cares about it.
But if 1.875A flows through 2.4 Ohms... that's 4.5V lost along the way out and another 4.5V on the way back, so you've lost 9V. That leaves only 15V for the lights, well outside their minimum requirement of 21.6V as per the datasheet.
So from this example, we can see that if your wires are too long, there's a problem. But that's only one way of looking at the issue. Had there been only one light, a lot less electricity would flow, so the drop wouldn't be so bad (only 1.5V). So a few things contribute:
Any wire has resistance, and we generally measure that in Ohms
Since resistance is a property of the wire, the longer the wire is, the more the resistance is - so where possible, you want shorter wires
Thinner wires have more resistance, so where possible, it's good to use bigger wires
Problems get worse when you use a lot of Watts. More Watts means more electricity has to flow, making the drop worse, faster
So a 'good' scenario is low power, with short, big wire. A 'bad' scenario is high power, with thin, long wire
So let's analyze a few more extreme cases. I'll start with that 21.6V limit for Loxone lights. That means the most drop we can tolerate is 2.4V. We also know that I've told you to limit trees to 80W each, which requires 3.33A. Since Volts = Amps * Resistance, then algebra says Resistance = Volts/Amps = 2.4V/3.33A = 0.72 Ohms. So at most, we can have 0.72 Ohms of wire in that circuit. That leaves 0.36 Ohms out, and 0.36 Ohms back - or only 90 feet each way. That's not great, but it's also not terrible. You can likely wire most houses with that... as long as your cabinet isn't in one corner of a big one-story ranch, and the lights in the very far corner, and you're taking the long way.
As an aside, those 0.72 Ohms will be warming up with all that current, burning about 8W of power on their own (Power = Volts Amps = 2.4V 3.33A). That's another one of the reasons I don't push for all 88W that the supplies are rated to.
But what if we leave Class 2? I've talked about how one of those Dimmers can consume 200W from a bigger supply (and I generally recommend 240W supplies). If you used a DIN-mounted supply (which again, I don't recommend), you could have non-trivial distance between the supply and the dimmer. And since the power is much higher, the voltage lost in the wire is also likely higher. At max output, the dimmer will consume 8.3A. If we use the same 16 AWG wire, and the same 2.4V maximum loss (10%), this time, we can only have R=V*A=2.4/8.33=0.28 Ohms - or about 36 feet each way. Not necessarily enough to cover a house, to be honest. Plus, you'd be warming those wires up with P=V*A=20W of power - another reason I use a 240W supply, even though I'm only using a 200W dimmer.
I mentioned above that "thicker wire is better". That's one of the reasons that I recommend using 14AWG between the power supply and your compact dimmers. The slightly thicker wire has lower resistance (2.5 mOhms per foot) so carries the power more effectively over distances. I would recommend 12AWG, but ... the dimmer's terminals are too small to fit it (they fit 18 AWG through 13 AWG). So 14 AWG is the best we can do (as I can't find any 13AWG for sale, anywhere).
This is another reason I also recommend putting the dimmer straight to the LED strip, without any wire in between. The dimmer, for an RGBW strip, has five terminals: +24V, and the four 'colors'. That single +24V line is shared among them all, and has to carry the whole 200W... and it's often quite thin, sometimes as narrow as 20AWG. 20AWG is only rated for 3.75A, but we're asking it to carry 8.33A. That ... should seem very suspicious. And it is. And this is one of those weird exceptions to the NEC. You can do ... dang near anything, as long as that anything is explicitly as per the manufacturers usage for an Underwriter's Lab listed product. That little "UL" certification is worth a lot as a result, and the LED strip you're buying had better have it, and since the LED strip tells you it's safe for up to a certain load/power/etc, then by gosh it's code compliant. But you'd better have the datasheet for the LED strip to prove it!
Innovate
Engage
owner@cltsmarthome.com
814-441-1443
© 2025. All rights reserved.
Disclaimer: This site is under construction, and the images are stock, not actual photos of work done by CLT Smarthome Link.